Configure High Availability for Men&Mice Central
Failover instances of Men&Mice Central can be configured to build a high availability cluster.
Note
To run the Men&Mice Suite in High Availability mode you must be using the MSSQL or PostgreSQL database backend for the Men&Mice Suite. High Availability mode is not available for other database types.
High Availability is also available for the database backend, see psql-ha and Always On Availability Groups for more information.
Note
For fine-tuning the settings for the Central High Availability cluster, see ha-tweaks.
Linux and Solaris
On the existing (or designated as primary) server running Central, edit the preferences file in
/var/mmsuite/mmcentral/preferences.cfg, adding
<ClusterMemberName value="somename"/>
to the end of the file. somename is the unique name that will identify the Central instance in the high availability cluster. (E.g. “1”, “primary”, or “central1”)
Restart the primary Central application:
systemctl restart mmcentral
3. Login to the Management Console as “administrator” and go to Tools –> Manage High availability. (The menu item is only available for the administrator account(s).) Click the Add button and enter the name used in the first step. Set the priority to 10.
Restart Central:
systemctl restart mmcentral
Login to the Management Console and verify that the current server is running with state “Active” in the Tools –> Manage high availability panel.
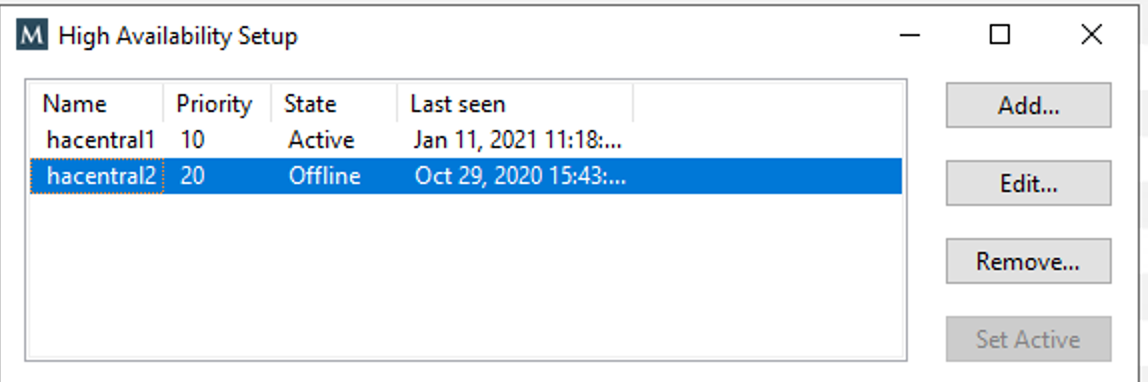
Click the Add button, and add a second server that’ll act as a high availability failover for the Central cluster. Same as previously, a unique name (e.g. “central2”) is required. Set priority to 20, and click OK.
On the just added secondary server, install the Men&Mice Central application. If it’s already installed, make sure it’s stopped by using (as root):
systemctl stop mmcentral
systemctl status mmcentral
Copy the
/var/mmsuite/mmcentral/preferences.cfgfile from the first server to the second, and change theClusterMemberNamevalue to match the one set in step 6 (i.e. “central2”). Save the file and exit.Start Central on the secondary server:
systemctl start mmcentral
Verify that you now have 2 servers, one primary, one secondary in Tools –> Manage High availability.
Create a round robin DNS name for the high availability setup, i.e. two A records with the same name, but each with the IP address of the primary and secondary server respectively.
Log in to the Management Console using the domain name set in the DNS as the server name to verify the high availability cluster is set up properly.
Note
Repeat these steps for each high availability failover you’d like to add. The priority for each failover member should be unique and higher than the primary.
Proceed to Server controllers.
Windows
In the existing (or designated as primary) server running Central, edit the preferences file
preferences.cfg, adding
<ClusterMemberName value="somename"/>
to the end of the file. somename is the unique name that will identify the Central instance in the high availability cluster. (E.g. “1”, “primary”, or “central1”)
Restart the primary Central application from the command line:
mmcentral –stop
mmcentral –start
Login to the Management Console as “administrator” and go to Tools –> Manage High availability. (The menu item is only available for the administrator account(s).) Click the Add button and enter the name used in the first step. Set the priority to 10.
Restart the Central application from the command line:
mmcentral –stop
mmcentral –start
Login to the Management Console and verify that the current server is running with state “Active” in the Tools –> Manage high availability panel.
Click the Add button, and add a second server that’ll act as a high availability failover for the Central cluster. Same as previously, a unique name (e.g. “central2”) is required. Set priority to 20, and click OK.
On the just added secondary server, install the Men&Mice Central application. If it’s already installed, make sure it’s stopped:
mmcentral –stop
Copy the
preferences.cfgfile from the first server to the second, and change theClusterMemberNamevalue to match the one set in step 6 (i.e. “central2”). Save the file and exit.Start Central on the secondary server:
mmcentral –start
Verify that you now have 2 servers, one primary, one secondary in Tools –> Manage High availability.
Create a round robin DNS name for the high availability setup, i.e. two A records with the same name, but each with the IP address of the primary and secondary server respectively.
Log in to the Management Console using the domain name set in the DNS as the server name to verify the high availability cluster is set up properly.
Note
Repeat these steps for each high availability failover you’d like to add. The priority for each failover member should be unique and higher than the primary.
Proceed to Server controllers.
Updating Central in High Availability setup
Warning
The Automatic Update feature cannot be used when the Central service is in High Availability setup
The procedure for updating the Central servers in High Availability is as follows:
Turn off the Central service on each secondary server
Upgrade the primary server manually using an installer. An installer can be downloaded from http://download.menandmice.com/
Upgrade each secondary server manually using an installer. After the upgrade finished successfully, the service will be started again.
Now, both servers should be upgraded and again in High Availability mode.